Best Valorant Deadlock Setups on Split in 2023
| Tags: Valorant
| Author Najib R
We present to you the ultimate Sentinel guide, containing every Valorant Deadlock setup on Split that you need to know
Sentinels in Valorant are the backbone of the team on defense. This role entails shutting down enemy rushes during Defense and monitoring potential flanking routes while on Attack. Valorant till now has introduced a total of five Sentinels Agents. The latest inclusion to this role is Deadlock, hailing from Norway.
Credit: Riot Games
Is Deadlock Viable?
Killjoy and Chamber have long dominated the Sentinel role in Valorant. Yet, with the conclusion of the Chamber-era marked by the 5.12 patch, Killjoy has emerged as an almost singular figure in this role. The introduction of Deadlock initially sparked expectations of a meta shift, given her promising early expression. Regrettably, despite a strong initial showing, Deadlock appeared to lose favor within the community shortly after her in-game debut.
Despite the falling out of grace, dismissing her viability across all maps would be inaccurate. While she may not match Killjoy's level of impact, Deadlock remains a potential asset when played adeptly, particularly on compact maps like Split.
To help you play Deadlock to her full potential on Split, we have prepared this comprehensive Deadlock setups guide.
Defense Side Deadlock Setups
Here are the best Deadlock setups on Split as the defending side:
A Site- Deadlock Setup
One of the most effective Deadlock setups on Split A Site is as follows:
- Barrier Mesh:
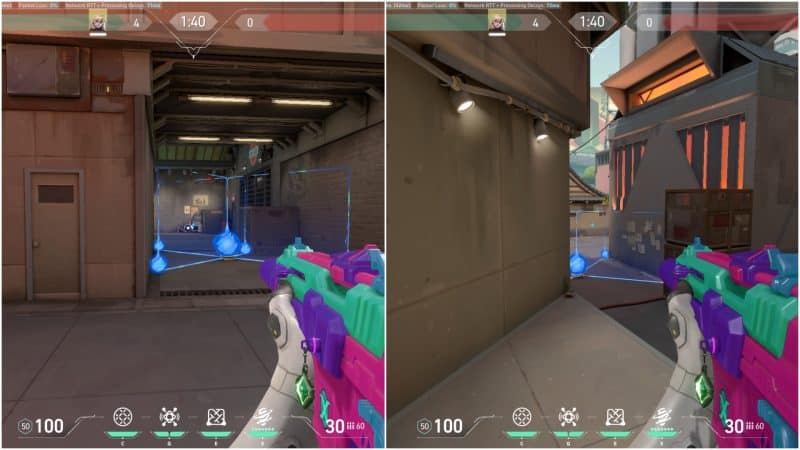
In the case of a full A Site setup, it goes without saying that it's best to use your wall at A-main. Position yourself at A-Heaven and align your crosshair with the fence, like the image provided. Throw your wall, and it will be deployed perfectly onto the A-main. You can also use the wall without the help of any lineup, and it would not make much of a difference. Only ensure the enemy cannot move past the Barrier breaking only one of the smaller orbs.
- GravNet:
If the opposing team is going for fast execution, throw the GravNet towards A-lobby to slow them down, buying crucial time for your teammates to rotate. Also, you can use it once they break your wall and are close to the Site. Throw the nade at the choke point and peek off of its contact.
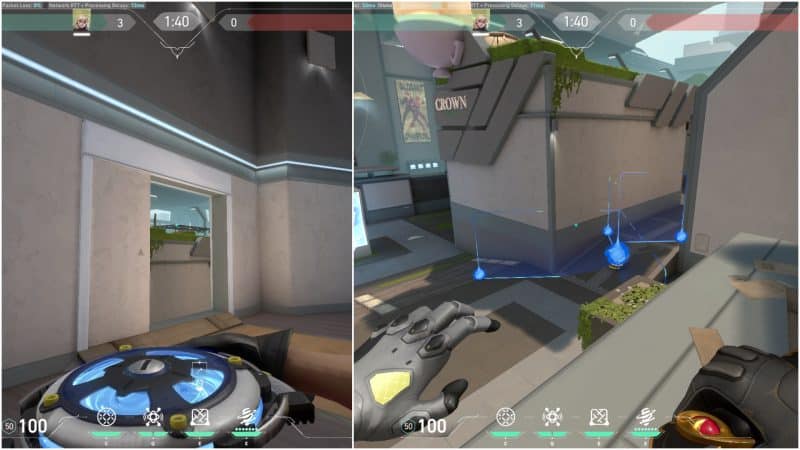
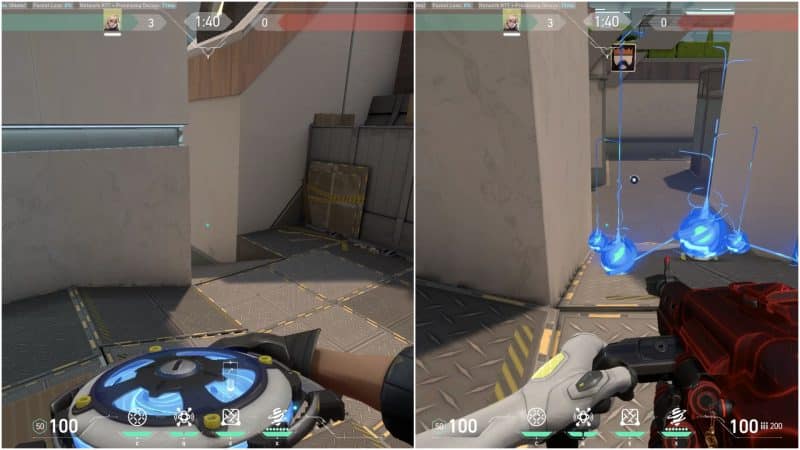
- Sonic sensor:
For a full A-site Setup, you will need both your Sonic Sensor close to the site. Use the first one at the corner of the Flower Pot near A-main. This placement capitalizes on the anticipated enem- rush towards the site following the breach of your wall, resulting in an immediate stun effect once the Sensor triggers. Also, since the Sensor is deployed at such a distance from A-main, the chances of the enemy preemptively destroying it are very low.
The next Sonic Sensor you should use is at the corner of the pillar within the site. This way, if you play Back Site or Elbow, it will help you shut off the attack, as the area stun provided by the Sensors is sure to get multiple enemies.
A Ramps- Deadlock Setup
If you are willing to give up control of the site and play for the retake, this setup for A-Ramps will be a life-saver as Ramps and Main control are massively beneficial for a successful retake of the site. Here is the best deadlock setup on Split A-ramps:
- Barrier Mesh:
If you want to funnel the enemy team toward the A-Main choke point while disregarding Ramps entirely, this Barrier Mesh is extremely effective. Throw it like the lineup in the Image above, so they must break the Middle orb to go past the wall. Since you are not likely to get rushed on Ramps with the wall there, you can even risk peeking and securing some early kills.
- GravNet:
If you don't use the Gravnet at the start of the round at A-Main, you can use it to slow their rush on A-Ramp if they break your wall.
You can also use it during your retake. Throw the GravNet at common post-plant spots such as Back Terminal or Elbow for a successful retake.
- Sonic Sensor:
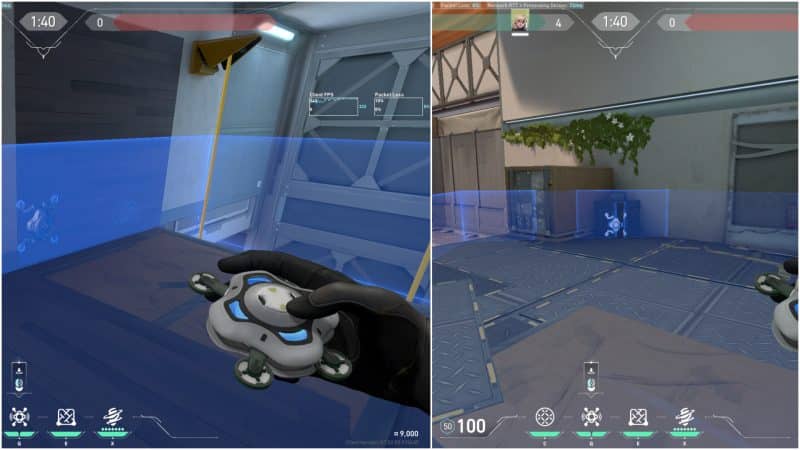
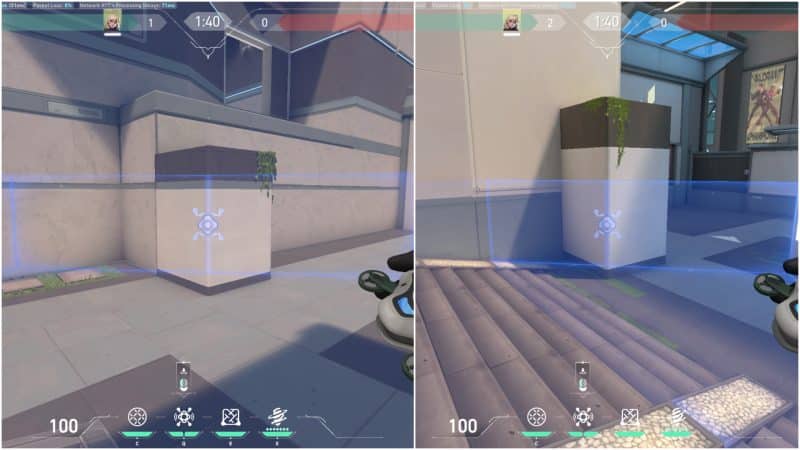
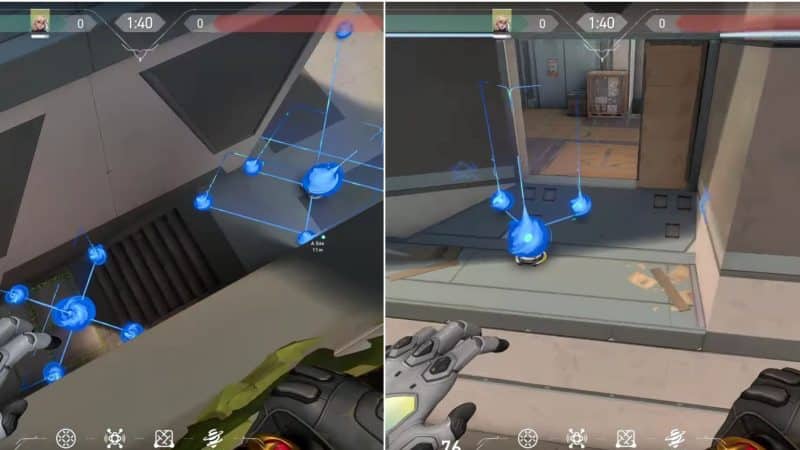
If the opponent intends to take ramp control in spite of your wall and proceeds to break it, that is where the sonic Sensors come into play. Put the first sonic Sensor behind the box like in the image above. Placing it this way ensures its concealment. If any agent from the opposing team runs up Ramp towards A-Heaven, the Sensor's activation guarantees their immobilization, vastly simplifying your engagement.
As for the next Sonic Sensor, you should place it close to the vents. It will serve multiple purposes. In addition to detecting anyone getting in A-Heaven, it will also provide info if someone comes up the ropes.
Mid- Deadlock Setups
The following is one of the best deadlock setups on Split Mid:
- Barrier Mesh:
You can use the Barrier Mesh similar to Sage Wall to block off Mid. However, it does not bring much to the table. Rather it is best to block off either Mail or Vents depending on whether your enemies are doing a B or A execution.
- GravNet:
You can throw the GravNet at Mid to slow the enemies trying to take mid-control.
- Sonic Sensor:
Place the first Sensor on Mail and the other on Vents. This way, the routes to both sites from Mid can be monitored.
B Site- Deadlock Setup
Here is an efficient deadlock setup on Split B Site:
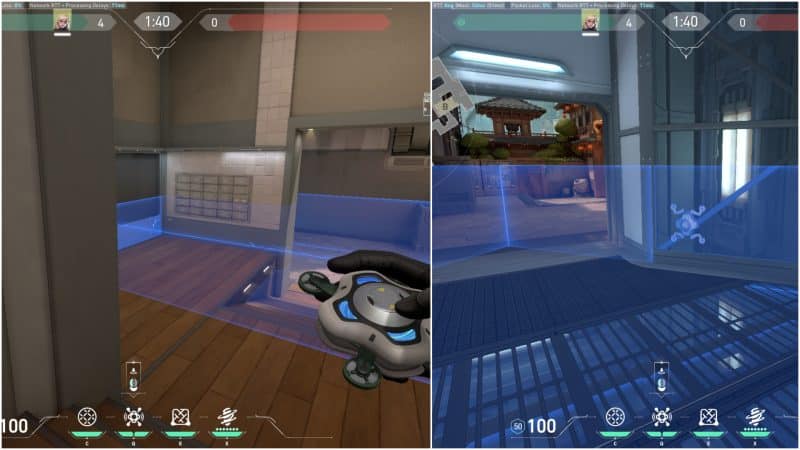
- Barrier Mesh:
There are quite a few choices of Barrier Mesh placement on B Site. The most common one is simply to block off B Main. While it may not be suitable if you want cheeky kills, it sure will buy you time.
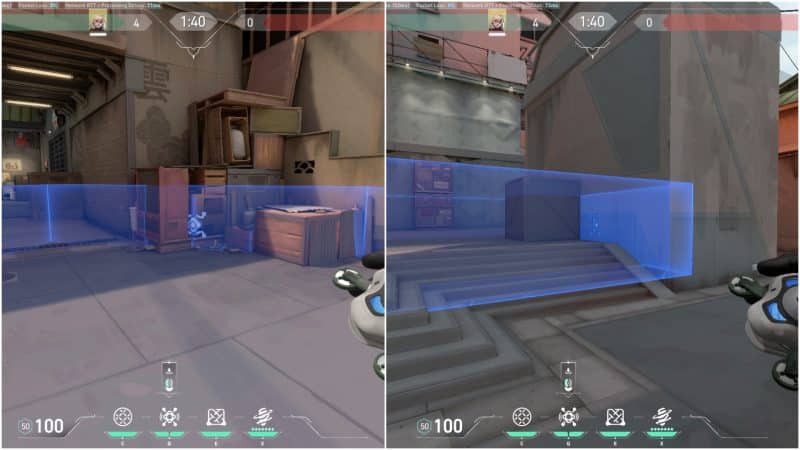
If you want an unconventional setup designed to get the enemy off-guard, place the wall similar to what is shown in the image and play from B-Hell. The perk of playing this angle with the wall is that you are very unlikely to get pushed while being able to catch the enemy rushing in Site off-guard.
- GravNet:
Similar to the other setups, usage of the GravNet remains situational here. Either throw it at Main to slow down the attack or save it to use in the retake for clearing common post-plant spots.
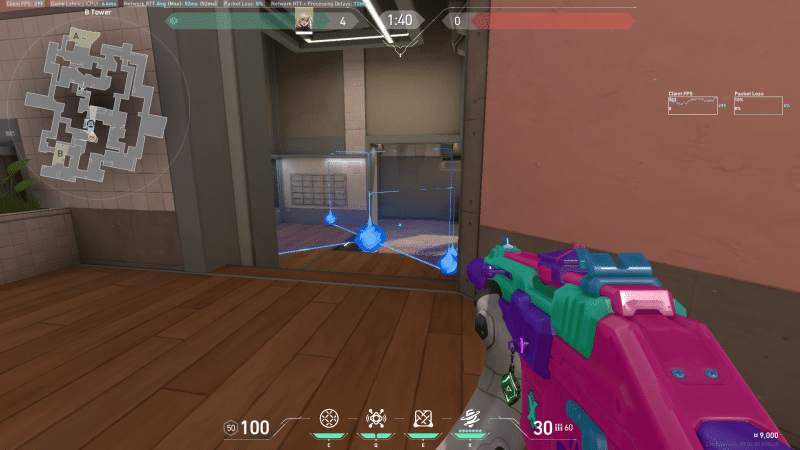
- Sonic Sensor:
The first Sonic Sensor you should go for is the box near the entrance. Considering how narrow the B entrance is, it proves highly valuable.
The next one you can place depends on your playing position. If you are playing back site, then putting it on the pillar (near Default) or the Board makes sense. On the other hand, if you play Pillar, deploy it onto the New Box.
Attack Side Deadlock Setups
There are no definite setups on Attack for Deadlock. Nevertheless, there exist fundamental principles on how to maximize the effectiveness of Deadlock’s toolkit on Attack. Here we will be showing you that:
- Barrier Mesh:
Barrier Mesh is most useful due to its ability to delay enemy pushes. Hence, as the attacking side, it is best to use it in the post-plant situation to block off enemies' entrances to the site. For example, the Screen or the Elbow on A site.
- Sonic Sensor:
While Sonic Sensor may have been designed to watch for flank, let's be real, anyone barely runs while trying to flank. This renders the using Sonic Sensor for flank-watching largely ineffective. Hence, it is best to use it in places where you expect the enemy to run into. For example, B Default Box or A Hell/Elbow.
- GravNet:
GravNet can become very useful in successful site execution. Below are some of the Deadlock Gravenet lineups you should learn:
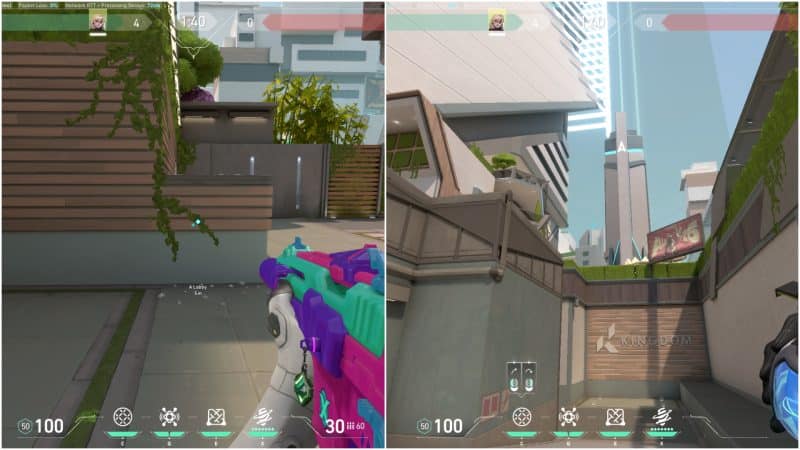
Stand in the position shown in the image, and aim your crosshair at the top of the building. Jump-throw the GravNet and it will land on Screens, not letting the site player get away.
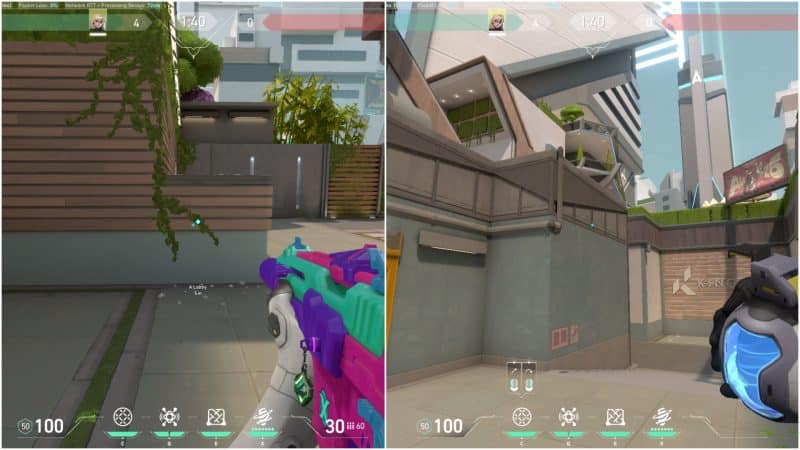
From the same spot, line up your crosshair with the beam and jump-throw. It will land on the Rafters, catching anyone trying to come out and peek from there.
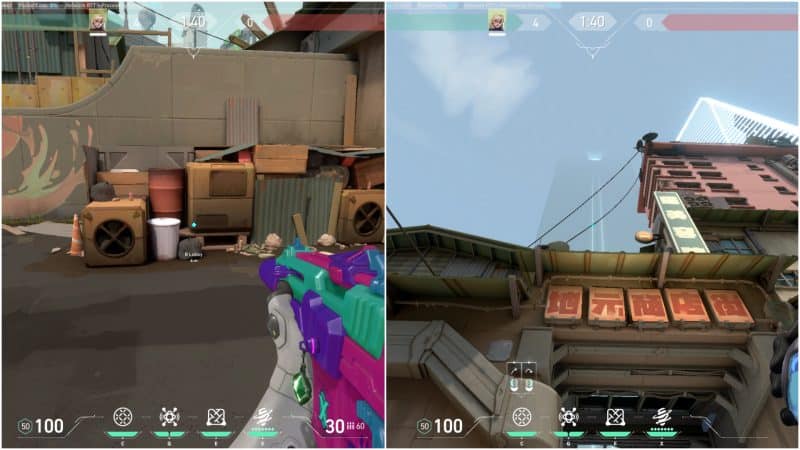
As for the B site, stand in front of the Garbage in B-lobby and line your crosshair with the white line like the image above. The Gravnet will land on spawn blocking anyone trying to leave the site or rotating in.
For more Valorant guides, make sure to follow us at ESTNN.